Eden of Gaming's day-one hub for Nekopara Sekai Connect. 41 catgirls rated, six meta team compositions, and the World Cruise GvG schedule auto-converted to your timezone. Pick a section to dive in.
Get started
Pick a section
Changelog
Recent updates
May 4, 2025New Character
Anniversary Vanilla released on limited banner, enhanced kit, SS-tier Festival support.
Apr 29, 2025Patch
Patch 2.1.0. Spring Festival season opened. Bond system rework live.
Apr 19, 2025Event
Chocola Birthday event, free pulls and exclusive story chapter through May 1.
Top tier Sweet Kitchen carry with a high uptime Food self-buff. Recommended reroll target for early game, recommended over Soufflé due to more frequent bias for Food over Sweets during early game content. Also cuter.
Top-tier Sweet Kitchen carry with Sweets self-buff.
5★SweetKitchenPowerTIER S
Recommended sets
Lovely
Keripo analysis
Top tier Sweet Kitchen carry with Sweets self-buff. Has a power SP requirement and better S3 passive percentage but is Sweets focused so not as good as Sakura for early game content. Still plenty strong and worth investing in later game for when Sweets food type is boosted.
Top-tier Sweet Floor carry. Pairs with Sakura.
5★SweetFloorPowerTIER S
Recommended sets
CasualFancy
Keripo analysis
Top tier Sweet Floor carry that pairs very well with Sweet Kitchen carries.
All-round Customer Service + Work Speed buffer.
5★SweetKitchenBuffTIER S
Recommended sets
Elegant
Keripo analysis
All-round generic support who buffs the team's Customer Service and Work Speed. Ideal in Sweet teams but can be used in any team.
Sweet Kitchen support. Buffs + enemy team debuffs.
5★SweetKitchenExtraTIER A
Recommended sets
Elegant
Keripo analysis
Decent Sweet Kitchen support with decent Sweet team buffs and enemy team debuffs. Good alternative to Vanilla but limited to Sweet teams.
Passion Floor carry. Drinks self-buff + team movement speed.
5★PassionFloorPowerTIER A
Recommended sets
CasualFancy
Keripo analysis
Strong Passion Floor carry with Drinks self-buff and useful generic team movement speed buff. Not as strong as Paramita but still a solid choice. If only Passion had a proper Kitchen carry...
Strongest Passion Floor carry. Drinks self-buff.
5★PassionFloorPowerTIER A
Recommended sets
CasualFancy
Keripo analysis
Strong Passion Floor carry with Drinks self-buff. Stronger than Chocola but would be a good idea to run both if a Sakura-tier Passion Kitchen carry were to exist.
Pop Floor carry. Food self-buff.
5★PopFloorPowerTIER A
Recommended sets
CasualFancy
Keripo analysis
Strong Pop Floor carry with Food self-buff. Not as strong as Brownie but still a generally good pick. Also very sexy.
Strongest Pop Floor carry. Drink self-buff, higher base stats.
5★PopFloorPowerTIER A
Recommended sets
CasualFancy
Keripo analysis
Strong Pop Floor carry with Drink self-buff. Higher base stats than Ak dut but Drink instead of Food.
Free 5-star starter. Pop CS + Work Speed buffer.
5★PopFloorBuffTIER B
Recommended sets
Elegant
Keripo analysis
Mediocre Pop Floor buffer. You get her as your starter free 5-star and are forced to invest into her a bit to unlock the story quest, so she will end up being part of your team for the first few days of the game. After that feel free to ditch her for something better.
Pop Kitchen SP debuffer. Only Pop P5 option.
5★PopKitchenDebuffTIER B
Recommended sets
Elegant
Keripo analysis
Decent Pop Kitchen debuffer but Vanilla would still be a better P5 pick if not locked into elements and there was a proper Pop Kitchen carry.
Passion Floor support. Eating-speed + team CS buff.
5★PassionFloorExtraTIER B
Recommended sets
Elegant
Keripo analysis
Decent Passion Floor support unit who increases the customer eating speed and buffs your Passion team's customer service and work speed while also contributing decently with a self Sweets buff. Would be a decent P3 pick if Passion ever gets some Kitchen carries.
Strongest debuffer in the game. CS + stamina down.
4★PassionFloorDebuffTIER B
Recommended sets
Elegant
Keripo analysis
The strongest debuffer in the game; customer service directly affects the opponent's points gain and stamina regen down increases the chance of their units running out of stamina if not running a healer or wearing stamina gear. Dampened only by the fact that she is a 4-star, resulting in a drastic loss of points potential on your side. A decent backup pick if you are unable to field 3x 5-star Power Floor units, but only if you're willing to invest hard into her skills.
Sweet Floor debuffer. High SP cost, less reliable than Cannelé.
5★SweetFloorDebuffTIER C
Recommended sets
Elegant
Keripo analysis
Mediocre Sweet Floor debuffer. While her SP skill is very strong, the high SP cost makes her much less reliable as a debuffer compared to Cannelé. Her only redeeming quality is being a Sweet 5-star and having a sassy personality.
Passion Floor buffer. Work speed + movement speed.
5★PassionFloorBuffTIER C
Recommended sets
Elegant
Only Pop Kitchen carry currently. 4-star ceiling.
4★PopKitchenPowerTIER C
Recommended sets
Lovely
Keripo analysis
Mediocre Pop Kitchen carry. Buffs are just ok and her stats are lower as a 4-star but she's also currently the only Pop Kitchen carry.
Backup Passion Floor carry. 4-star.
4★PassionFloorPowerTIER C
Recommended sets
CasualFancy
Keripo analysis
Decent Passion Floor carry if you're out of 5-star Floor options. Very solid and respectable skills, dampened only by her status as a 4-star.
Pop Kitchen healer. Stamina recovery + low Stam consumption.
5★PopKitchenHealerTIER D
Recommended sets
Elegant
Sweet Floor healer. Random ally stamina recovery.
4★SweetFloorHealerTIER D
Sweet Floor SP battery. Stamina recovery support.
4★SweetFloorExtraTIER D
Passion Floor 4-star. Drinks self-buff.
4★PassionFloorPowerTIER D
Passion Floor buffer. Movement speed + CS buff.
4★PassionFloorBuffTIER D
Passion Floor debuffer. SP + Work Speed down.
4★PassionFloorDebuffTIER D
Passion Kitchen debuffer. AoE CS down + Work Speed down.
3-star Sweet Kitchen healer. Stamina recovery on active.
3★SweetKitchenHealerTIER F
3-star Passion Kitchen. Used as filler in Passion-only teams.
3★PassionKitchenPowerTIER F
3-star Passion Floor. Self Drinks self-buff kit.
3★PassionFloorPowerTIER F
3-star Sweet Floor. Self Sweets self-buff kit.
3★SweetFloorPowerTIER F
3-star Passion Kitchen buffer. Kitchen CS up.
3★PassionKitchenBuffTIER F
3-star Pop Kitchen. Self Sweets self-buff kit.
3★PopKitchenPowerTIER F
3-star Pop Floor. Self Sweets self-buff kit.
3★PopFloorPowerTIER F
3-star Pop Floor buffer. Floor CS up.
3★PopFloorBuffTIER F
3-star Passion Floor debuffer. Enemy Food down.
3★PassionFloorDebuffTIER F
3-star Pop Floor debuffer. Enemy Drinks down.
3★PopFloorDebuffTIER F
Element
Role
Type
S
Floor
Kitchen
A
Floor
Kitchen
B
Floor
Kitchen
C
Floor
Kitchen
D
Floor
Kitchen
F
Floor
Kitchen
Floor/Kitchen split mirrors Keripo's tier-list layout. Click a cat to jump to the Cats tab.
Section 03
Accessories Guide
Accessories give base stats, minor percent bonuses unlocked by leveling, and most importantly a set bonus. Only the set bonus is worth chasing early — base stats and percents are background noise next to the set.
How to obtain
Where accessories come from
Selector Accessory Box
Cash shop packs (Menu → Shop → Normal → Set Sale)
VIP shop (Menu → Shop → Normal → Single Item)
VIP unlocks (switch language to JP, Menu → Shop → Gems, click VIP gauge)
Accessory Hunt
Daily limited farm via Quests → Gift Quests → Accessory Hunt
Unlock the highest tier you can support and run it every day
Set bonuses
The five sets
Set bonuses only count when you run all pieces at the same rarity. A complete 5p 4-star set is stronger than 3p 5-star + 2p 4-star. Don't mix.
Set
Bonus
Used for
Lovely
Stamina consumption -20%
PvP / GvG primary
Elegant
SP Gauge recovery speed +20%
Floor / Kitchen support
Fancy
Lucky Star rate +20%
Niche / luck-scaling content
Fresh
Cooking speed +20%
PvE Kitchen carry
Casual
Movement speed +20%
PvE Floor carry
Recommended sets
PvE vs PvP loadouts
PvE · serve customers fastest
Floor carryCasualMove speed clears tables faster
Floor supportElegantSP recovery for skill rotations
Kitchen carryFreshCook speed is the bottleneck
Kitchen supportElegantSP recovery
PvP / GvG · stamina-first
All unitsLovelyCustomer volume punishes stamina
P5 Kitchen supportElegantException — SP recovery still wins here
Leveling accessories
Every piece in a set gives identical stats, so it doesn't matter which one you upgrade. Initial bonus rolls can be rerolled. Leveling burns coin, so chase the right set first and save the coin for catgirl levels until the set is locked in.
Section 02
Tutorial Roll
Your free tutorial 5-star is the most important pull of the run. The current rate-up banner already covers one Floor carry and one Kitchen support — use your guaranteed 5-star to round out the Kitchen carry slot.
How the team is built
Teams run 3 Floor (frontline) + 2 Kitchen (backline). Floor units are all active with one main carry; Kitchen runs one carry plus a support backup.
Ideal starter
Starter team composition
Pos
Unit
Element
Role
Note
P1
Ak dut
Pop
Floor
Pop coverage
P2
Muffin
Sweet
Floor
Main Floor carry
P3
Chocola
Passion
Floor
Banner rate-up
P4
Sakura
Sweet
Kitchen
Main Kitchen carry
P5
Vanilla
Sweet
Kitchen
Banner rate-up · support
Section 04
Team Building
Raw stats win Nekopara. 5-star Power units carry the floor and kitchen across every mode — element-correct buffers and debuffers fill the remaining slots. Trend teams swap based on which food/drink type is boosted that day; element-only teams cover element-locked content.
The five modes
Where these teams get used
Quests
Story progression grinding
1 team
Conquest
PvP
1 team
Cruise
GvG
1 team
Towers
Element-restricted climbs
Per element
Event Raids
Rotating specialist comps
Variable
Notation
How to read each slot
PPower
BBuffer
DDebuffer
EExtra
HHealer
Names in (parentheses) are not ideal picks but are the currently best option available. Off-Trend 5-star Power units still beat on-Trend 4-stars because raw stats outscale buff percentages early.
Meta teams
Six compositions, paired by use case
Trend
Food Trend
When Food is the boosted type
Floor
PMuffin
P(Brownie)
P(Ak dut)
Kitchen
PSakura
BVanilla
Element
Sweets-only
Sweet-element-locked stages
Floor
PMuffin
PSablé
DSaffron
Kitchen
PSakura
BVanilla
Trend
Sweets Trend
When Sweets is the boosted type
Floor
P(Muffin)
P(Paramita)
P(Chocola)
Kitchen
PSoufflé
BVanilla
Element
Passion-only
Passion-element-locked stages
Floor
PParamita
PChocola
DCannelé
Kitchen
P(Suzu)
D(Azuki)
Trend
Drinks Trend
When Drinks is the boosted type
Floor
PParamita
PChocola
PBrownie
Kitchen
P(Sakura)
BVanilla
Element
Pop-only
Pop-element-locked stages
Floor
PBrownie
PAk dut
BFraise
Kitchen
P(Yuzuha)
DLicorice
Follow-ups
Common questions
Why not use 4-stars that give the proper Trend buff?
Lower raw stats. Off-Trend 5-star Power units still beat on-Trend 4-stars because levels and rarity scale harder than buff percentages.
What if I don't have unit X?
Make do with what you have. These are the meta teams, not the F2P-friendly teams. The Cats tab lists viable substitutes by role.
Where is the Passion / Pop Kitchen carry?
There isn't one. Sweet has Sakura and Soufflé; Passion and Pop are stuck running Vanilla, Licorice, or off-element Sakura at P5 until Sayori releases a proper Passion or Pop Kitchen Power unit.
Section 01
Initial Progression Guide
Stats over everything else. Skills and gear matter but raw levels carry the run. 5-star units gain meaningfully more stats per level than 4-stars — treat 5-stars as the only legitimate level-up targets early.
Why Position 2 and Position 4
Each team is 3 Floor (frontline) + 2 Kitchen (backline) units. The way combat plays out, your Position 2 unit becomes the main Floor carry and your Position 4 unit becomes the main Kitchen carry. You can clear most early content with just those two leveled. Other slots are backups.
Priority order
Who to level first
#
Unit
Element
Role
Why
1
Sakura
Sweet
Kitchen
Main Kitchen carry
2
Muffin
Sweet
Floor
Sweet Floor carry
3
Chocola
Passion
Floor
Passion Floor carry
4
Ak dut
Pop
Floor
Pop Floor carry
Reference
5-star Power units
P-type units have strong self-buffs. These are the legitimate level targets — everything else is a backup.
Unit
Element
Role
Sakura
Sweet
Kitchen
Soufflé
Sweet
Kitchen
Muffin
Sweet
Floor
Chocola
Passion
Floor
Paramita
Passion
Floor
Ak dut
Pop
Floor
Resources
Where to get coin and EXP
Frontloaded one-time rewards dominate early. Burn them on coin and Royal Fromage (EXP) for your Floor and Kitchen carries before anything else.
Soleil Storefront
Passive · idle hourly income
The idle layer. Furniture upgrades scale your hourly coin yield but skip furniture investment until your Floor and Kitchen carries are leveled. Click Duty every few hours and hit Auto so you keep your bonus stack rolling.
Cash Shop
Limited daily / weekly packs
The fastest early-game resource pipeline. Menu → Shop → Normal → Set Sale. Stock up on Neko Growth packs (coin + EXP) and feed your Floor carry first — most early stages clear before the food even cooks. Watch for other coin/EXP packs that rotate in.
Main Quest
Tower climb · one-time rewards
Not actually a story mode — it's an auto-proceed tower climb. Normal Mode gives rewards + player EXP; Hard Mode gives rewards. This is your main coin/EXP pipeline early. Retry stages until RNG clears, or level up and come back.
VR Cat Tower
Tower climb · daily 4-runs each
Unlocks later. Four towers: Cat Tower (any element), Sweet, Passion, and Pop. Build one Floor carry per element (Muffin / Chocola / Akdut) so you can clear all four. Tower access rotates daily — each tower you can hit is repeatable up to 4× that day.
Accessory Hunt
Daily limited runs
Quests → Gift Quests. Three hunts: Gift (awakening), Accessory (drops), Material (storefront). Coin is your bottleneck early, so prioritise Accessory Hunt. Sell any accessory you don't need (see Accessories section) to convert to coin.
Section 05
World Cruise · GvG
Weekly guild-vs-guild bracket. Usually runs every other day, with a Sunday back-to-back. The schedule below converts to your local timezone automatically — original game schedule is anchored to America/New_York. You only get two hits per battle, so coordinate in Discord before queueing.
Weekly schedule
Four phases · times in UTC
Converted from the game's America/New_York schedule. DST is handled automatically.
Matchmaking11:00 AM – 8:59 PM
Battle3:00 AM – 2:59 PM
Tally3:00 PM – 8:59 PM
Open9:00 PM – 10:59 AM
Eligibility
Who participates and who gets rewards
Join the guild before Matchmaking starts to be eligible to participate.
Stay in the guild until Tallying ends to receive rewards.
Eligibility locks at the start of matchmaking — the window between Tally end and next Matchmaking is the safe swap zone.
Format
How a battle works
Defence Deck
Set it as soon as you can and keep it current. Defence teams run on auto battle with no auto-win like PvP — a weak defence loses outright.
Points & hits
Each defence team is worth 3 points. Each attacking player gets 2 hits. If you out-level the target, run Hard mode to take all 3 points in one hit. Otherwise coordinate in Discord so two players don't waste hits on the same enemy.
Battle length
Each battle lasts 1:30. Higher total score wins. You can use the same team for both attack attempts — invest hard into one strong team rather than spreading levels across two mediocre ones.
Reputation buff
Hits on already-defeated enemies still grant the entire guild a stack of Reputation buff (+1% all stats) plus contribution points. Mop up the bracket even after the win is locked.
Live notes
Things to watch for
Mechanics
Advanced Tips
Practical takeaways from colordepth's NSC mechanics research, edited for serious players. What to grind, what to skip, and where the math actually pays off.
Rating & stats
Customer Service is rating-only. It adds to your displayed Player Rating but does nothing in-battle.
CS still matters inside Lucky Star windows; the 1.225× multiplier hits CS too.
Pre-battle multipliers (VIP%, Memory Board, Title Bonus, Neko Bond) all scale off your Base. Improving Base compounds across all four.
Active skill bonuses and Food Truck stickers apply after the GO splash, so they don't show in displayed rating, but they still scale off base stats during the match.
Furniture is currently a 0× multiplier. Don't invest in it expecting rating gains.
Courtyards
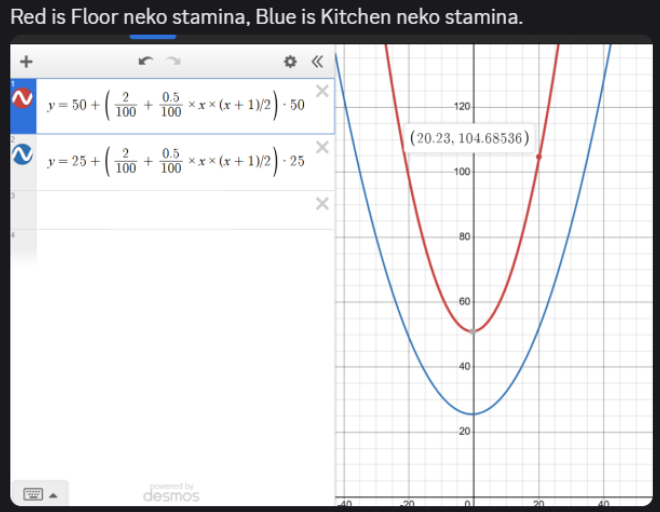
Courtyard bonuses scale triangularly: L10 gives +27.5%, L20 gives +105%. Each new level is worth more than the last.
Max one courtyard at a time. L10 on a single yard beats L7 split across two.
Only one courtyard is currently levellable. The other four are pinned at level 1.
Contests
Contest autowin triggers when enemy rating falls below ~80% of yours.
If you're sitting 25%+ above a target's rating, expect a free win. Use that ratio when picking fights.
Lucky Star
Base Lucky Star trigger rate is 10%. The Fancy set raises it to 12%, not 30%; the +20% is multiplicative on the base rate.
The Lucky Star multiplier is approximately 1.225× (likely exactly 1.2 or 1.25; confirmation pending).
The multiplier hits both Dish and Customer Service. Plan team comp knowing CS-heavy nekos still benefit during procs.
Score RNG
Score variance is a clipped gaussian with ±20% spread around the calculated value. Single contests are noisy.
Don't rebuild over one bad run. Re-run before reading anything into a result, especially in PVP where one game can flip an outcome.
Special Skill timing
SP recovery is exactly 2.0 SP/sec; no start delay, no inter-hit delay. Base activation interval = SP ÷ 2.
CS is a menu-independent score parameter. It adds to your menu scores (not multiplies), and it matters for both Floor and Kitchen nekos. What it does not do is alter any in-battle mechanic. CS is a rating-only stat.
Research · Section 2
Pre-battle bonus components
Pre-battle boosts apply before the "GO" splash and are part of a neko's displayed total rating:
FinalBoost = PlayerIntercept (depends on store level, rank progress)
           + Base
           + Base × CourtyardBonus
           + Base × VIP%
           + NekoBond
           + MemoryBoard
           + TitleBonus
           + 0 × Furniture   (still under investigation)
Active and passive skill bonuses, plus Food Truck stickers, apply after the GO splash. Those are not part of the displayed total rating, but they still scale off your base stats during the match.
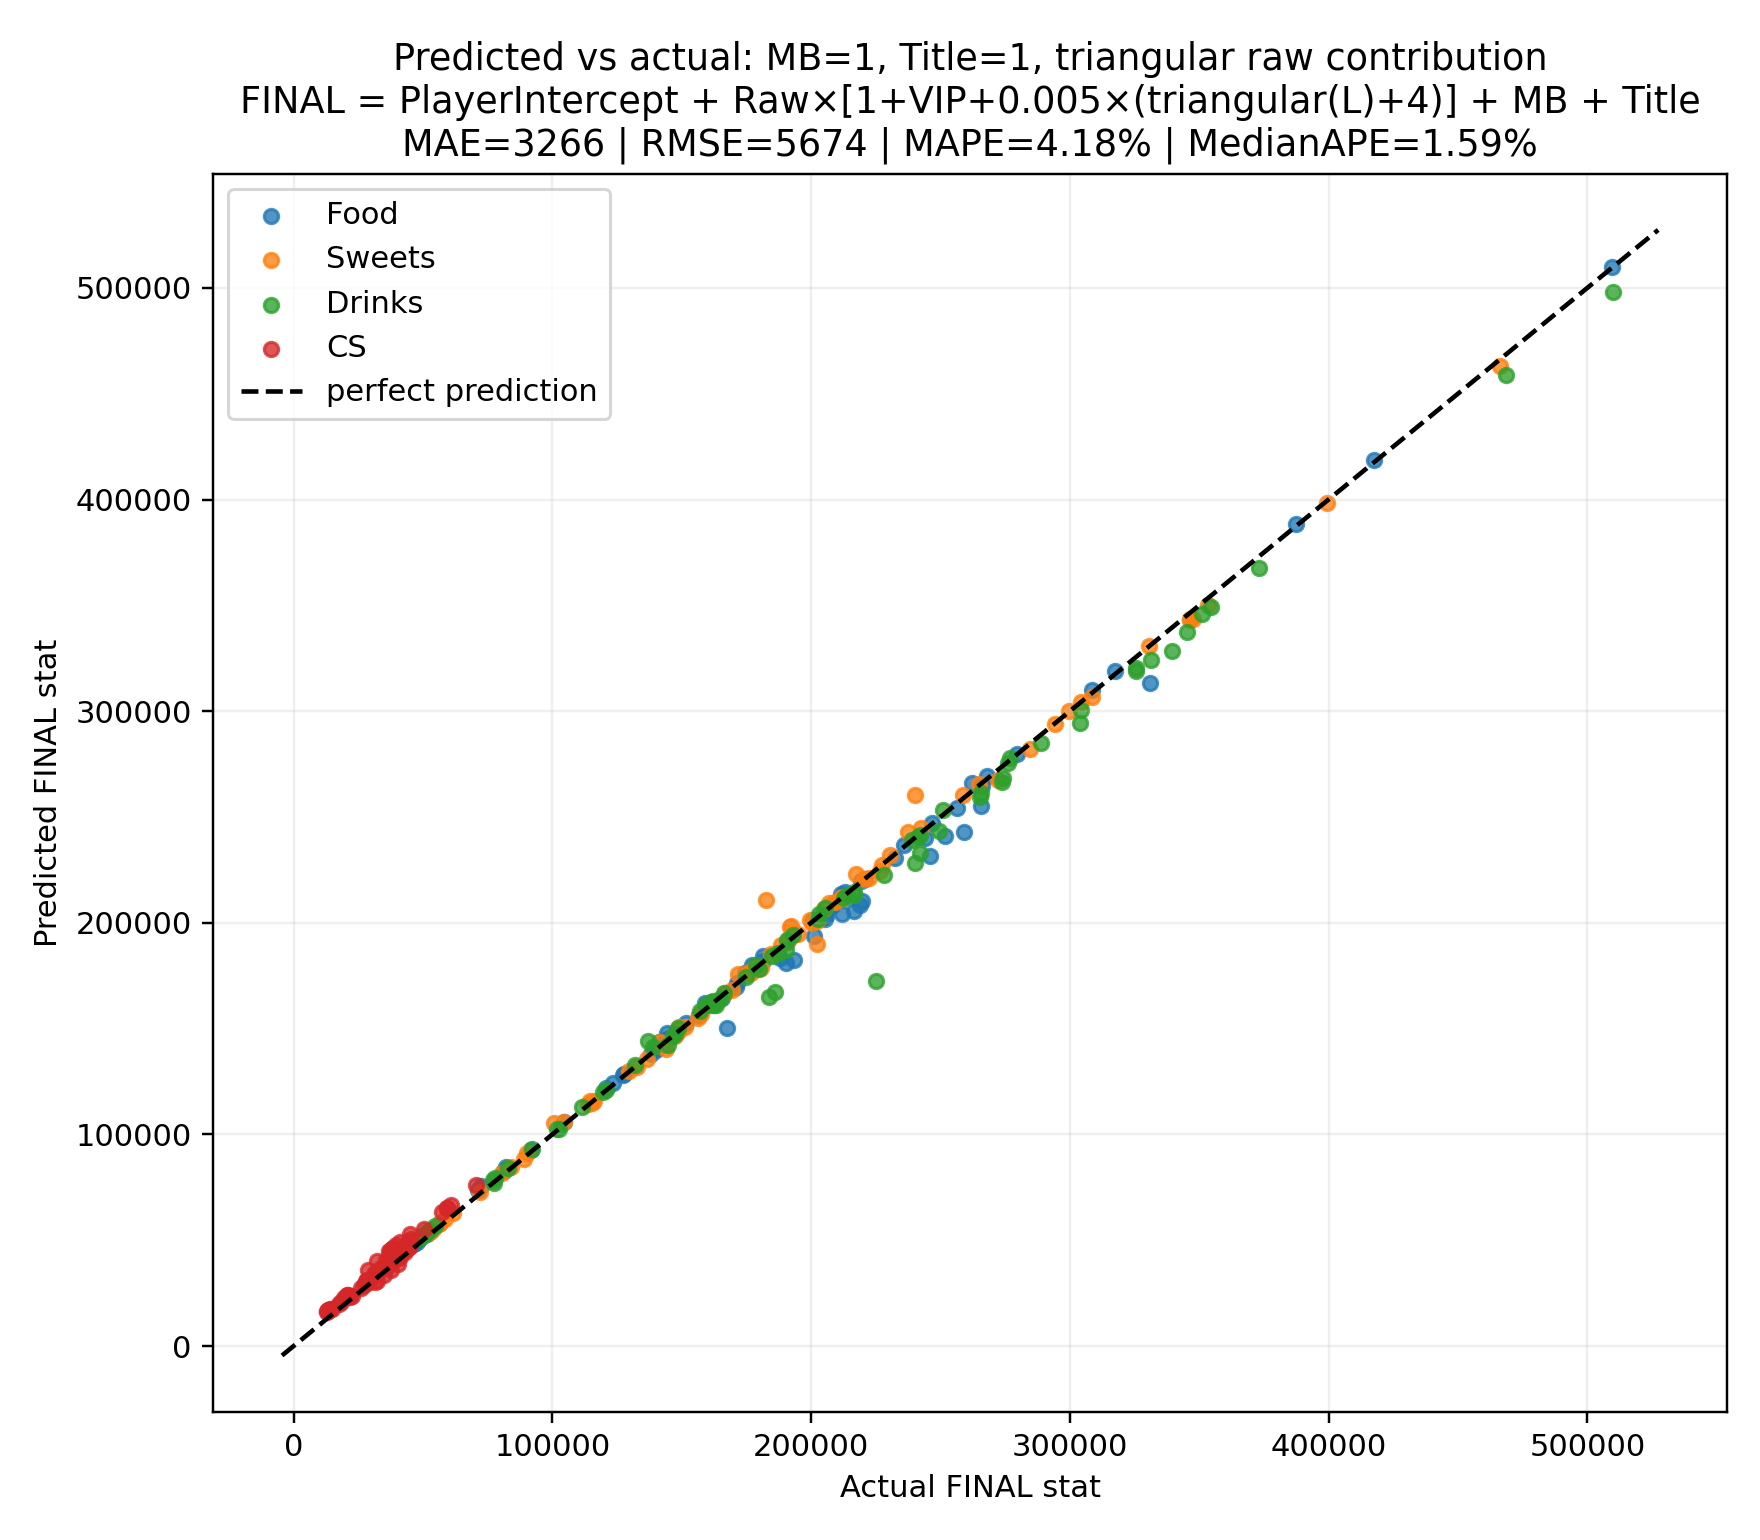
Predicted vs observed boosted stats (Food, Sweets, Drinks, CS, Stamina). The simplest working model still tracks closely.
Research · Section 3
Courtyard scaling
There are five courtyards (A through E), each contributing 0.5% per level using a triangular formula. Only one is currently levellable; the rest are pinned at level 1:
Stamina contribution scales triangularly with courtyard level. The acceleration past mid-levels is what makes high investment worth it.
Research · Section 4
Contest autowin data
Three confirming data points behind the ~80% threshold:
Your rating
Enemy rating
Ratio
Result
2,716,000
2,282,000
84%
Manual fight
2,716,000
2,066,000
76%
Autowin
1,200,000
1,000,000
82%
Manual fight (word of mouth)
Research · Section 5
Lucky Star trigger rate and multiplier
The in-game "Morale" stat (テンション in JP) is the Lucky Star trigger rate. Base Morale is 10, giving a base 10% trigger rate. The Fancy set increases this rate by 20% multiplicatively:
Base trigger rate    = 10%
Fancy set new rate   = 10% × 1.20 = 12%   (NOT 30%)
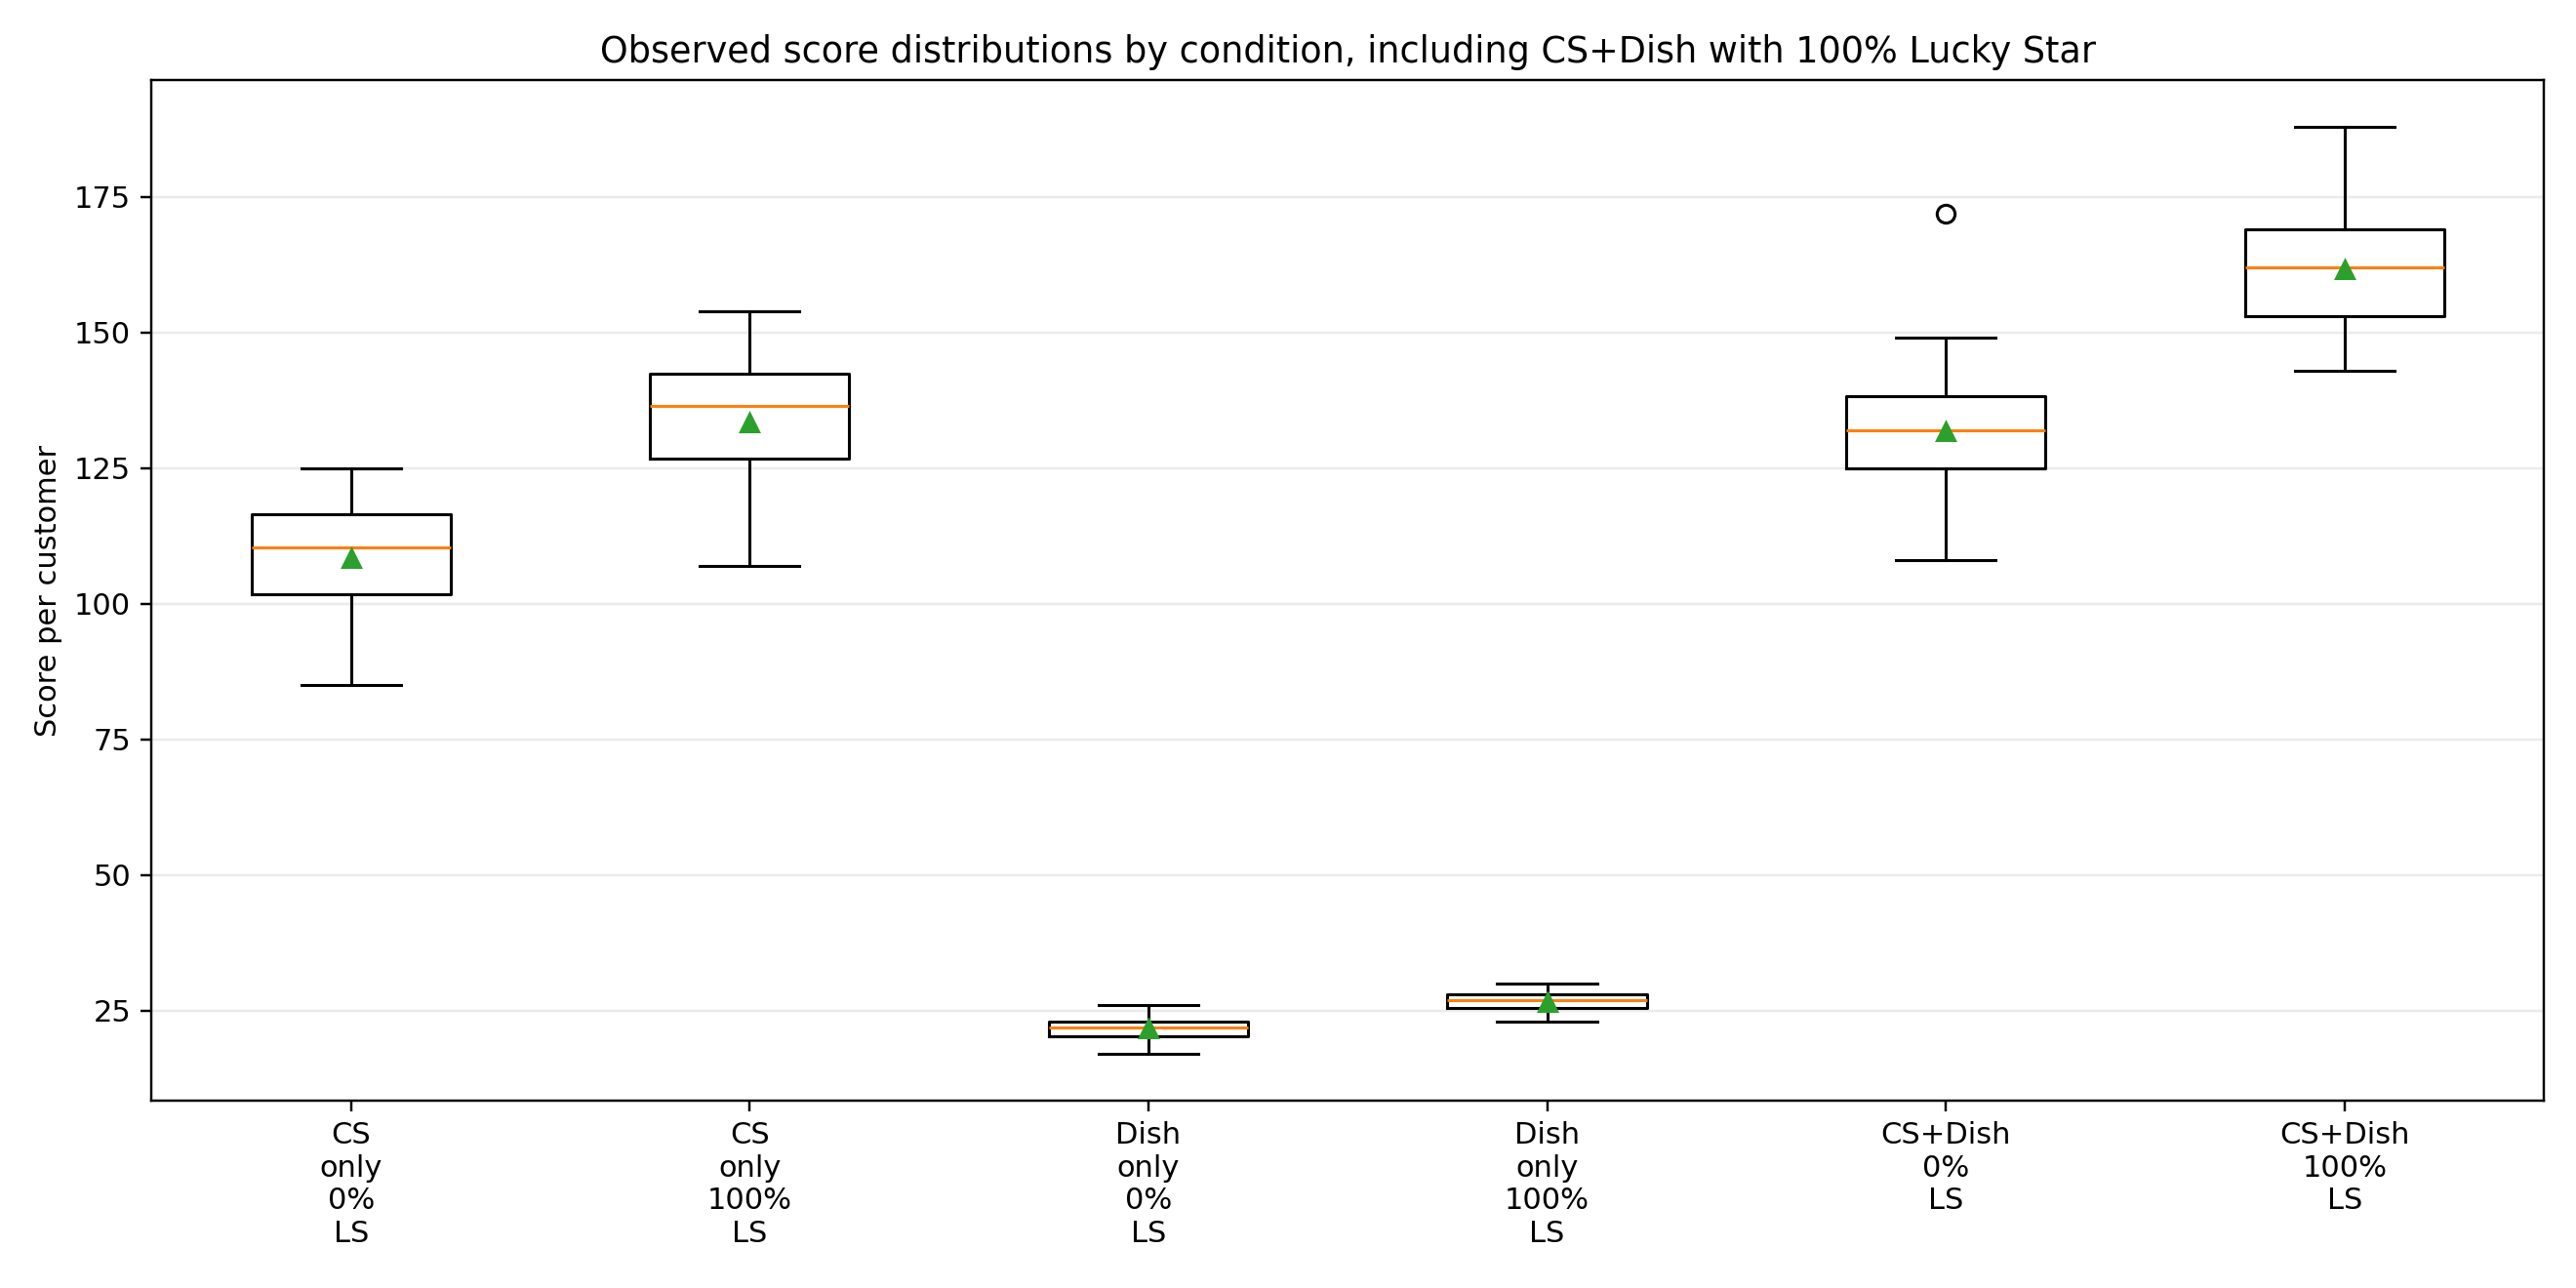
When Lucky Star triggers, both Dish score and Customer Service score get multiplied by approximately 1.225 (likely exactly 1.2 or 1.25; precise value pending confirmation). Measured base-score expression:
Sample size: 143 isolated data points (84 non-Lucky-Star, 59 Lucky-Star), controlled for buff and debuff skill noise.
Non-Lucky-Star (0% LS) vs Lucky-Star-only (100% LS) score distributions, isolated from buff and debuff noise.
Research · Section 6
Score RNG distribution
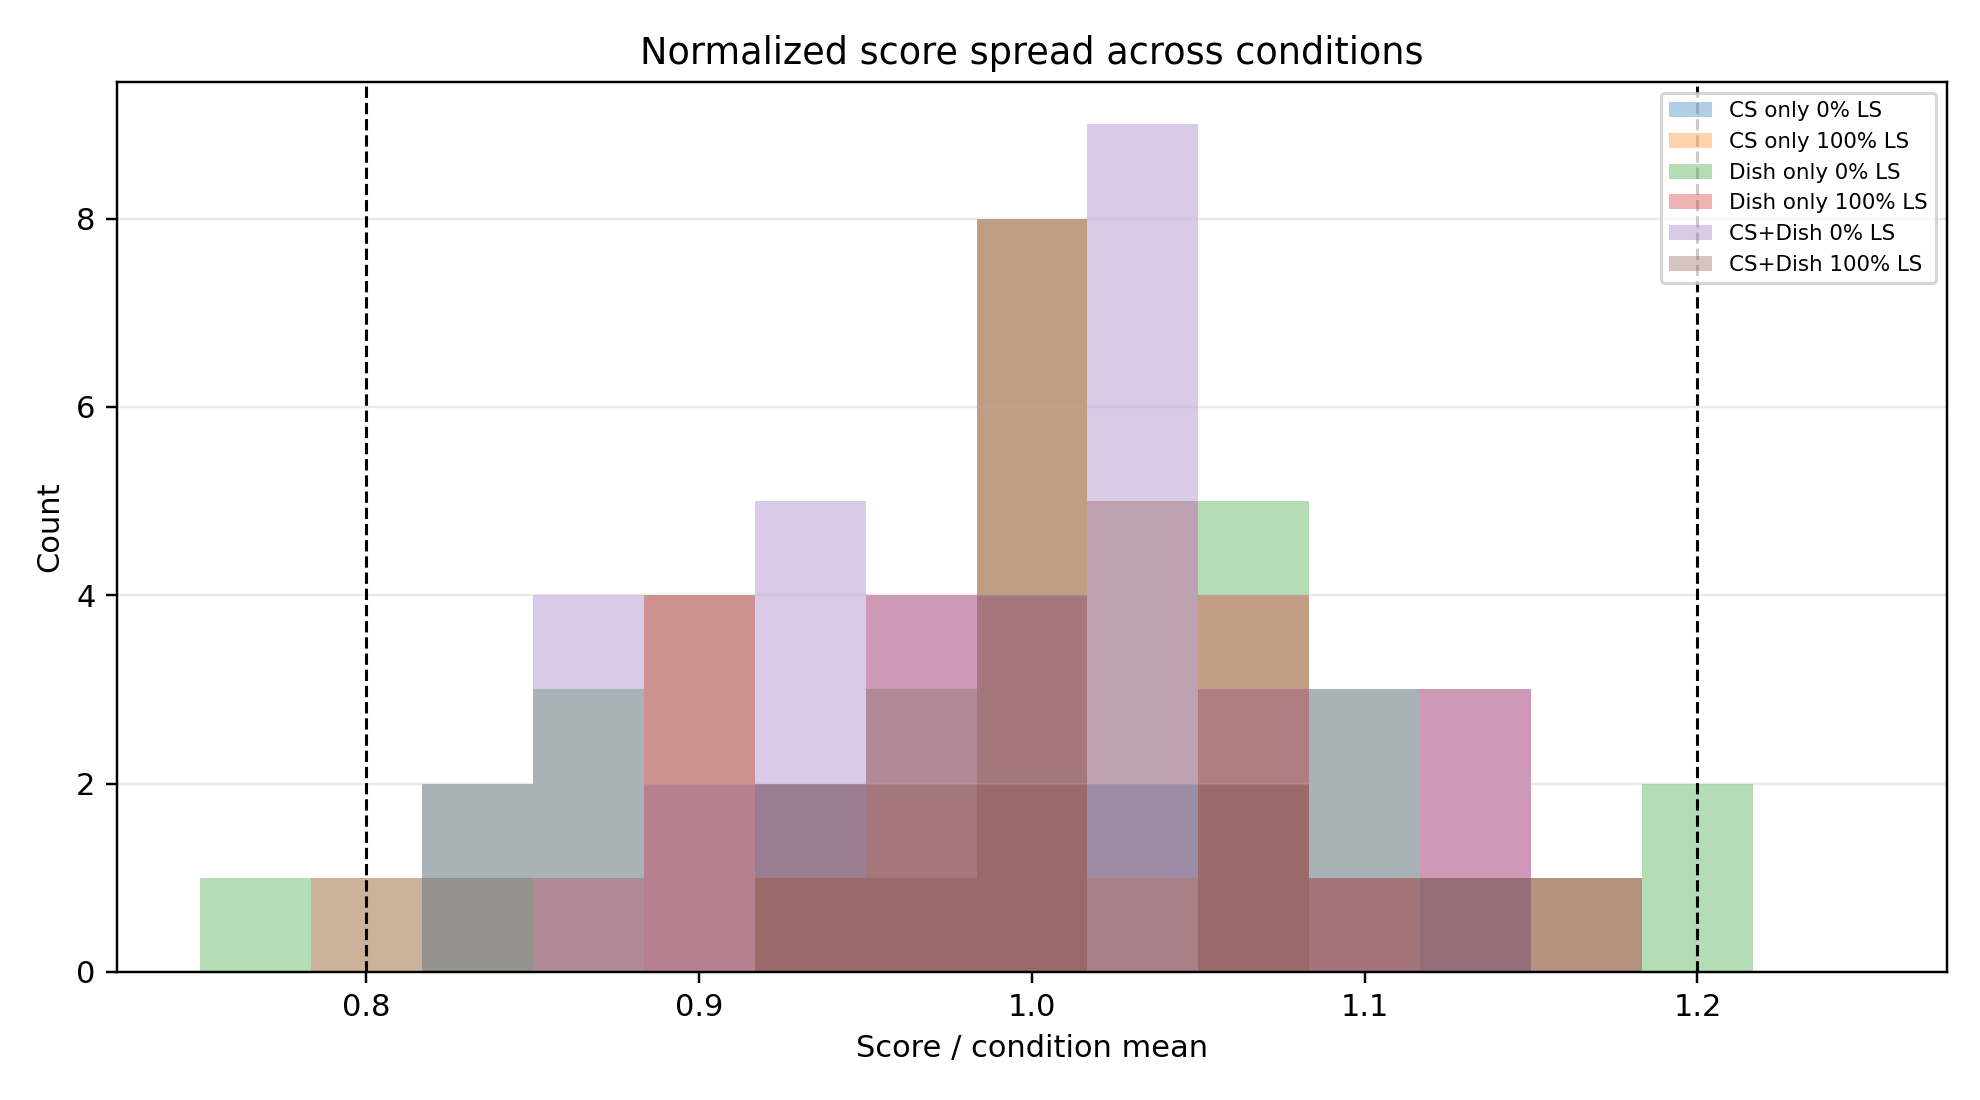
Across the same 143 clean data points (controlled for bonuses, buffs, debuffs), score RNG follows a clipped gaussian with about ±20% spread. Outliers are rare and mostly attributable to manual measurement error or truncation.
Observed score deltas across 143 isolated data points. The shape is gaussian, clipped at ±20% from the mean.
Kitchen vs Floor scoring. A Kitchen neko's score is generated when cooking starts (Lucky Star also flashes then), then buffered for display when the customer finishes eating. SP buffs need to land on the cook-start moment. Floor nekos use a similar buffer that releases on a short 2 to 4 second timer, not during the Floor-Kitchen interaction itself.
Research · Section 8
Stamina costs
Kitchen action: 10 stamina per action.
Floor action: 6 stamina per action.
Stamina recovery triggers after 2 to 4 seconds of inaction. Plan rotations so high-cost actions are spaced rather than back-to-back, especially during Kitchen burst windows.
Research · Section 9
Bond and furniture caveats
Train the catgirls. Win the Cruise.
Live Nekopara Sekai Connect meta, build coordination, and World Cruise scheduling.